
This generator lets you import png, jpg and gif files and converts them into commands which create the image as a giant mural on your Minecraft map. All this can be done without MCEdit or mods. The generator scans every pixel in the image and chooses the closest color match from the available blocks. The only software you may need is an image editor like Photoshop to create images.
Step 1 - Import an Image
You need to consider how big the mural is going to be when it is placed in your map. This is important as a default Minecraft map has a maximum build height of 255. If you build an mural at sea level (62), this gives you about 193 blocks high to work with. You may need to scale(resize) your image first if it is too high. There is a feature that lets you scale the image. 1 is the original size. 0.5 halves the size and 2 would double the size. Simple! For best results and quicker processing times, you should upload low resolution images to start with which are around 200x200 pixels or less.
This generator attempts to slice the mural into sections as efficiently as possible. Images with fewer colors such as a logo can be created in fewer commands when compared to a photograph.
If the image you have supplied exceeds the Command Block's maximum character limit of 32,767, The commands will be split into many sections and you will have to copy them into the command block one at a time. This is explained later.
The alpha channel in an image is what controls the transparency. This tool will treat an alpha value of 0 as totally transparent and no blocks will be placed. An alpha value of 1 or higher will not be considered as transparent and will be color matched with the most appropriate block.
Scale:
Step 2 - Set the Placement
Set the placement of the mural. Here you just need to decide which direction the player faces when viewing the mural. Murals on the ground are created on the layer directly under the command block. The bottom-left corner of the mural will be under the command block. Some blocks have a different side and top texture. The placement you choose will affect the available textures and will reset the selections you make in step 3.
Step 3 - Choose your Blocks
Select
Select
Choose the blocks you wish to exclude or include. By default all blocks are included but sometimes you may not want certain blocks in the image. To choose your blocks click the checkboxes from each of the groups that you wish to include. If there are any blocks that you want to exclude, just click them. They can be chosen again if you reselect the groups. Tip: If selecting 'All Blocks' you may wish to deselect the individual stained glass blocks. They tend to spoil the picture due to their transparency. Blocks that fall (sand, gravel and concrete powder) are now included but murals are now drawn from the bottom up. Exclude falling blocks if the bottom row has no existing blocks under it.
Step 4 - Preview
After you have selected the blocks, you can click the 'Show/Update Preview' button to see a preview. You will see a large render of what the mural will look like with the chosen Minecraft blocks. You can zoom in and out get an idea about what the mural may look like from a distance.
Show/Update PreviewStep 5 - (OPTION A) Download the Datapack file
With this option you can use a datapack containing one or more functions which make the mural. If you use this option, you can then skip all of the other steps below. This is the best option to use if the picture is going to be huge. The commands that create the picture will be divided accross many mcfunction files if required.
Step 5 - (OPTION B) Download the mcfunction file
With this option you can use mcfunction files to create the mural. If you use this option, you can then skip all of the other steps below. Please read the Wiki on Function Files to find out how it works. There is a limitation of 65,536 commands per function file. For a large picture, you may need to divide the function file into smaller files.
Step 5 - (OPTION C) Manually make the mural (Survival Mode)
Maybe your playing on a server where commands blocks are not allowed. Perhaps you'd like to build the mural manually. Click the button below to view the materials you'll need.Materials
Step 5 - (OPTION D) Place a Command Block (Create mural with minecarts)
 You will need to be in creative mode now and you will need to give yourself a command block with this command:
/give @p minecraft:command_block
The mural is built relative to this command block so this will determine where you place the command block. The bottom of the mural will be at the same vertical position (y) as the command block. And it will be built one block to the right of the command block when facing the direction specified in step 3. Place some redstone blocks as shown here.
Step 6 - Command Length
In some situations, the commands that are generated may be too long and might cause errors when pasted into a command block. In normal situations, the value in the box can be left as is. As the number is reduced, it is likely that more command sets will be produced below. Do not set this value over 32000.
Maximum Command Length
Step 7 - Generate the Mural
Below you will see the generated commands that you will need to paste into the command block. Large and complex images will have the commands split into many parts while less complex images will have fewer parts.
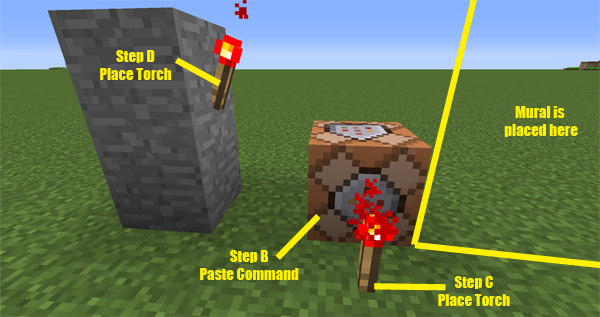
To generate the image you will need to repeat these steps.
- Click the button for the next part (above)
- Copy and paste this part into the command block
- Place a redstone torch in front of the command block
- Place a redstone torch to the top-left of the command block(next to minecarts)
- You should see some blocks created on the bottom row
- Break both redstone torches
- Repeat until you have have completed all of the command parts
Step 8 - You're Finished
Hopefully it worked and the mural looks great. If so you can destroy the redstone blocks and command block.
